

Learning how to change the battery in a DSC or other-brand motion detector is usually simple. The main challenge is knowing which battery the sensor uses and how its cover opens. A wireless motion detector may also report a low-battery or tamper condition after you service it.
DSC sensors are common in residential security systems across the United States, but many homes also use motion detectors from other brands. The basic battery replacement process is similar, yet the cover design, battery type, and reset method can differ. Always use the instructions for the exact model when they are available.
A good battery change should do more than stop a warning beep. You should also make sure the sensor sits firmly, the cover closes fully, and the alarm panel receives a normal signal. Taking a few extra minutes to test the detector can prevent a false sense of security.

How to change the battery in a DSC or other-brand motion detector
The exact steps can vary by model, but the basic process is much the same. First, identify the detector and its battery. Next, put the alarm system in a state that will not cause an unwanted alarm while you work. Then open the sensor, replace the battery, close the cover, and test the device.
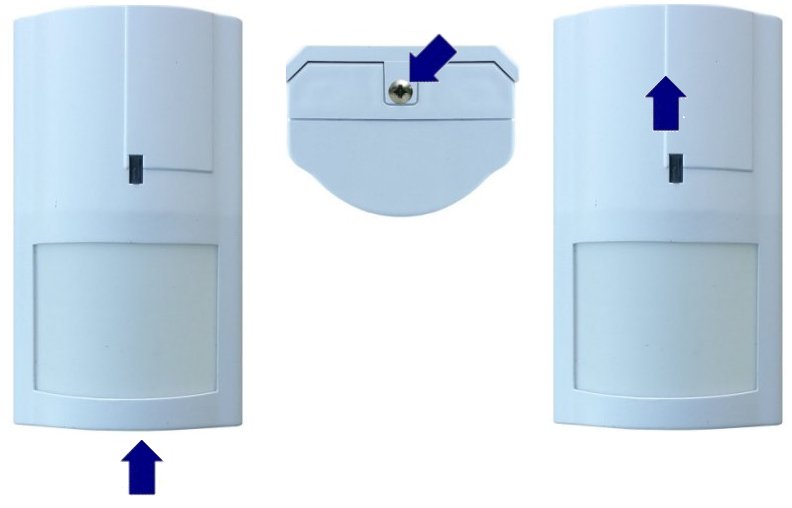
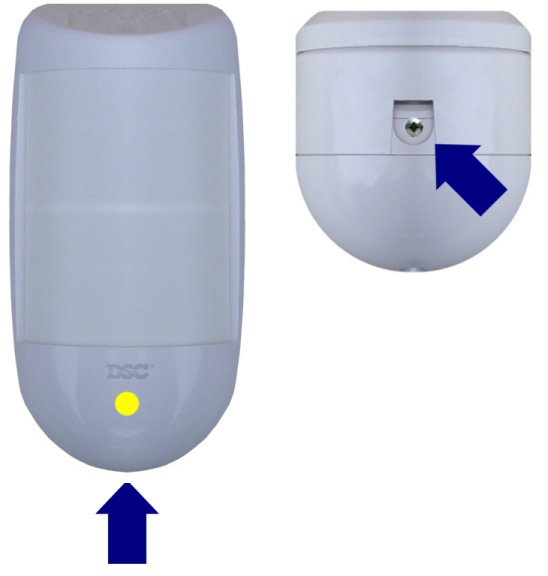
If you are following a guide on how to change the battery in a DSC or other-brand motion detector, do not force the cover. Some sensors slide upward. Others use a small tab, screw, or hinged cover. Forcing the case can break a plastic clip or damage the tamper switch.
For a wireless sensor, the battery is often inside the detector housing. A hardwired sensor is different because it normally gets power from the alarm system wiring. In that case, there may be no standard user-replaceable battery inside the motion detector.
- ✦ Identify the detector
Look for the model number on the front, side, back, or inside of the sensor. The model number is more useful than the brand name alone.
- ✦ Check the battery
Read the old battery label or the detector manual. Match the battery type, voltage, and required configuration.
- ✦ Prepare the alarm system
Follow the security system instructions for putting the system into a suitable service or test state. If your system is professionally monitored, use the procedure provided by the monitoring company.
- ✦ Replace the battery
Open the detector carefully, remove the old battery, install the new one with the correct polarity, and close the housing.
- ✦ Test the sensor
Walk through the detector’s normal coverage area and confirm that the alarm panel or security app receives the expected motion signal.
Why the exact model matters
DSC has made many motion detector models, and other security brands use many different designs. Two sensors can look almost identical while using different batteries or different opening methods. That is why the model number should guide the repair.
If you cannot find the model number, take a clear photo of the detector and inspect any label inside the cover. Avoid guessing the battery from appearance alone.
- ✦ Do not rely on appearance
A similar-looking detector may use a different battery or may be hardwired instead of wireless.
- ✦ Keep the old battery until you confirm the replacement
The label on the old battery can provide useful information about its type and voltage.
Before you open the motion detector
Before you start, take a moment to understand how the alarm system is connected. A wireless motion detector may communicate with a DSC panel, an alarm hub, or another receiver. Opening the housing can activate the detector’s tamper switch and create a trouble message.
If your security system is professionally monitored, follow the instructions from your alarm company before servicing the device. Depending on the system, a tamper signal or test transmission may be sent to the monitoring center. You do not want a routine battery change to create an unnecessary dispatch or alarm event.
Gather the replacement battery, a small screwdriver if the model needs one, and the detector’s manual if you have it. Keep the work area clear so you do not drop the sensor or lose a small screw.

- ✦ Replacement battery
Use the battery specified for the exact detector model. Do not substitute a random battery because it has the same physical size.
- ✦ Small screwdriver
Some detectors use a small screw to secure the cover. Many do not need a screwdriver.
- ✦ Model information
Keep the model number or manual nearby so you can confirm the correct battery and closing procedure.
- ✦ Alarm monitoring information
If a monitoring company handles your system, use its test procedure before and after service.
How to tell if the detector is wireless
A wireless motion detector normally has a battery compartment and communicates with the alarm panel by radio. A hardwired detector normally has wires entering the housing and receives power from the security system.
Do not assume every DSC motion detector is wireless. If you see wiring connected to the sensor, stop and identify the model before removing anything.
- ✦ Wireless signs
A battery compartment and no visible alarm wiring are common signs of a wireless detector.
- ✦ Hardwired signs
Wires entering the detector housing usually indicate that the sensor receives power from the alarm system.
How to identify the correct replacement battery
Choosing the right battery is one of the most important parts of learning how to change the battery in a DSC or other-brand motion detector. The correct battery depends on the detector model. Some wireless sensors use common alkaline cells, while others use different battery packs or lithium cells.
Look at the old battery before throwing it away. Write down its type and voltage, then compare that information with the detector manual. If the manual lists a specific manufacturer or battery pack, follow that recommendation.
Do not mix old and new batteries in a multi-cell compartment. If the detector uses more than one cell, replace the set with matching batteries of the correct type.
- ✦ Read the battery label
Check the battery type, voltage, and size printed on the battery.
- ✦ Check the detector manual
The manual is the best source for the battery specification when it is available.
- ✦ Match the polarity
The positive and negative marks must match the markings inside the detector.
- ✦ Use fresh batteries
Avoid batteries that have been stored for years or show signs of leakage, swelling, or damage.
Can you use rechargeable batteries
Do not assume a rechargeable battery is a suitable replacement for a standard battery. Rechargeable cells can have different voltage characteristics, and some security sensors are designed for specific battery chemistry.
Use the battery type approved or specified for your detector. If the manufacturer does not support rechargeable cells, use the recommended non-rechargeable battery instead.
- ✦ Follow the model specification
The detector’s documentation should determine whether a rechargeable battery is suitable.
- ✦ Avoid unsafe substitutions
Do not change battery chemistry simply because another cell fits the compartment.
Step-by-step DSC motion detector battery replacement
Once you have the correct battery, the physical replacement is often quick. Work slowly and avoid touching parts that you do not need to touch. If the housing does not open as expected, stop and check the model instructions instead of forcing it.
The following process is a general guide for wireless DSC and similar motion detectors. Your model may use a different cover or battery layout, so treat these steps as a starting point rather than a substitute for model-specific instructions.
- ✦ 1. Put the alarm system in the proper state
Follow your alarm system or monitoring company’s procedure before opening the sensor. This helps prevent an unwanted alarm or monitoring event.
- ✦ 2. Locate the detector cover
Inspect the housing for a release tab, screw, hinge, or sliding section. Do not pry hard on the plastic.
- ✦ 3. Open the housing
Release the cover using the method designed for the detector. Keep the cover close to the sensor so you do not pull on any connected parts.
- ✦ 4. Locate the battery
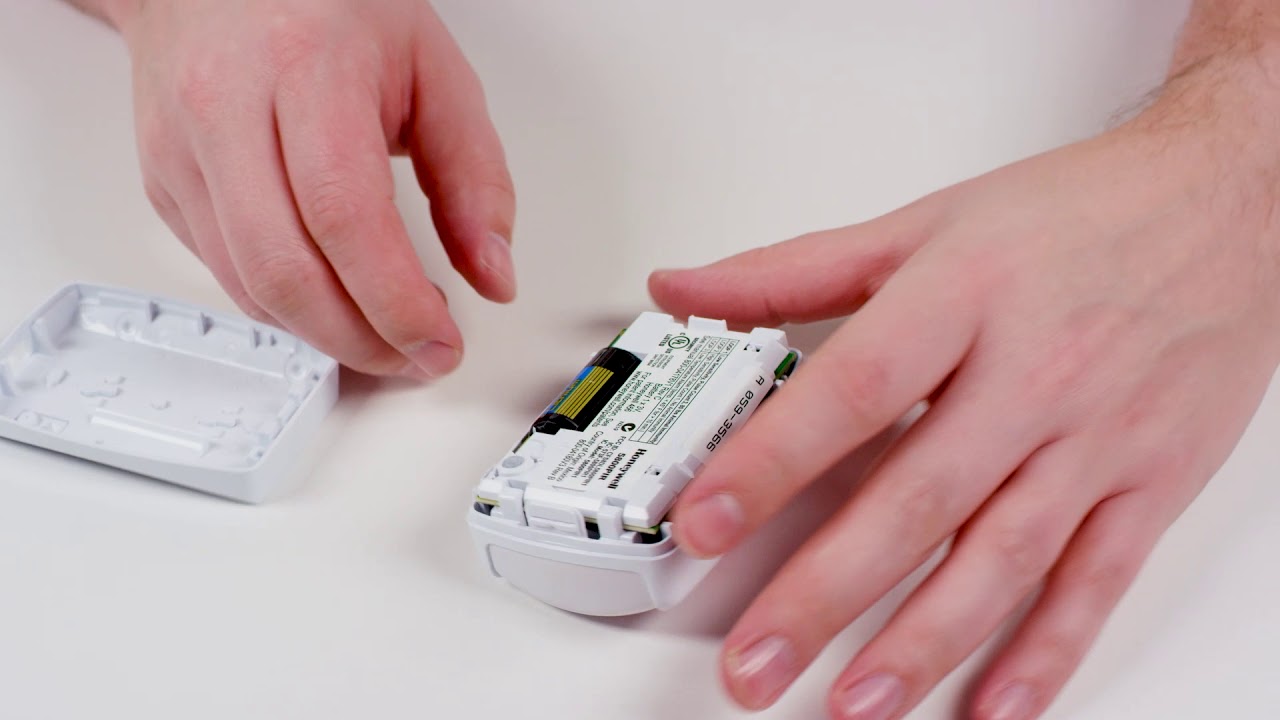
Find the battery compartment and note how the battery is positioned before removing it.
- ✦ 5. Remove the old battery
Disconnect or lift out the old battery as designed. If the battery looks swollen, damaged, or leaked, stop and handle it with care.
- ✦ 6. Install the new battery
Place the new battery in the same orientation as the old one. Match the positive and negative markings.
- ✦ 7. Close the detector
Make sure the cover sits correctly and fully engages the housing or tamper switch.
- ✦ 8. Test the sensor
Use the alarm system’s test mode when available, then walk through the detector’s coverage area to confirm normal operation.
What to do with the tamper switch
Many security sensors have a tamper switch that detects when the cover is opened or the device is removed. If the cover does not close fully, the system may continue to show a tamper warning even after you install a new battery.
Make sure the cover is seated exactly as designed. Do not tape, bend, or disable the tamper mechanism. If the tamper warning remains, inspect the housing and then consult the detector or alarm panel instructions.
- ✦ Close the cover fully
A loose cover can keep the tamper switch open.
- ✦ Do not bypass the tamper switch
The tamper feature is part of the security system and should remain functional.
How to change the battery in a different brand motion detector
The same basic method applies to many other wireless motion detectors, but the details can change. Brands may use different cover clips, battery packs, tamper switches, and reset procedures. The safe approach is to identify the exact model first.
If you are searching for how to change the battery in a DSC or other-brand motion detector, remember that the phrase covers many different products. A battery that works in one wireless motion sensor may not work in another, even when both sensors are used with similar alarm panels.
After replacing the battery, allow the sensor and alarm panel time to communicate. Some systems need a short period before the low-battery warning clears. If the warning remains, troubleshoot the battery, cover, sensor, and alarm panel rather than immediately replacing more parts.

- ✦ Honeywell or Resideo-style sensors
The opening method and battery specification vary by model. Check the model number before removing the battery.
- ✦ 2GIG sensors
Wireless sensors may use a model-specific battery arrangement and communicate with a compatible security panel.
- ✦ ADT-branded sensors
ADT systems can use sensors from different manufacturers, so the sensor model matters more than the ADT name alone.
- ✦ Other wireless sensors
Follow the manufacturer’s battery type, polarity, cover, and test instructions.
Why brand name alone is not enough
Security companies often install equipment made by different manufacturers. A detector sold as part of one alarm system may have been made by another company. This makes the model number the most useful way to identify the correct procedure.
When researching how to change the battery in a DSC or other-brand motion detector, search using the exact model number whenever possible. That can prevent mistakes caused by a guide for a similar-looking sensor.
- ✦ Find the model
Check the front, back, side, or inside of the detector for a model label.
- ✦ Compare the housing
Use the shape, buttons, cover design, and label to confirm that the instructions match your sensor.
How to test the motion detector after changing the battery
Battery replacement is not complete until the detector works normally. A new battery can still leave a problem if the cover is not closed, the battery is installed backward, or the alarm panel has not received a new signal.
Start with the alarm panel or security app. Check whether the low-battery or tamper message has cleared. Then use the system’s test procedure and walk across the sensor’s normal detection area.
Avoid standing directly in front of the detector at first. Motion sensors often detect movement across their field better than movement straight toward them. Walk through the protected area in a normal way and confirm that the system responds.
- ✦ Check for a low-battery warning
The alarm panel or app should stop reporting the detector as low on battery after the system recognizes the replacement.
- ✦ Check for a tamper warning
A tamper message can mean the cover is not seated correctly or the detector is not mounted as intended.
- ✦ Test normal movement
Walk through the sensor’s usual coverage area and confirm the expected alarm or test response.
- ✦ Confirm the detector returns to normal
After testing, make sure the alarm panel shows the sensor in its normal ready state.
What if the low-battery warning stays on
If the warning does not clear, check that the replacement battery is the correct type and is installed with the right polarity. Also check that the battery contacts are seated correctly and that the detector cover is fully closed.
Some alarm systems may need time to receive a new transmission from the sensor. If the warning remains after normal testing, use the panel’s troubleshooting instructions or contact the security provider.
- ✦ Recheck the battery
Confirm the battery type and polarity.
- ✦ Recheck the cover
Make sure the housing is fully closed and the tamper switch is engaged.
- ✦ Test again
Trigger normal motion in the sensor’s coverage area so the system can receive a fresh transmission.
Common problems after a motion detector battery change
Most battery changes go smoothly, but a few problems appear often. A detector may continue to report a low battery, show a tamper alert, fail to detect movement, or trigger a fault on the alarm panel. These issues do not always mean the new battery is bad.
Start with the simple checks. Confirm the battery type, polarity, cover position, and sensor mounting. If those items look correct, the problem may involve the alarm panel, radio communication, wiring, or the detector itself.

- ✦ The panel still says low battery
Check the battery type, installation, contacts, and whether the detector has sent a new signal to the panel.
- ✦ The panel shows a tamper
Check that the detector cover and mounting plate are seated correctly.
- ✦ The detector does not sense motion
Confirm that the sensor is powered, mounted correctly, and aimed at the intended coverage area.
- ✦ The detector causes repeated faults
A recurring fault can point to a sensor, communication, wiring, or alarm-panel problem that needs further diagnosis.
- ✦ The battery leaks or looks damaged
Do not continue using a damaged battery. Follow safe battery handling and disposal practices and inspect the detector for damage.
When you should stop and call a professional
Battery replacement is usually a reasonable DIY task for a simple wireless detector, but not every alarm problem should be handled this way. If the sensor has damaged wiring, signs of corrosion, a damaged circuit board, or repeated faults after a correct battery replacement, professional service may be the safer choice.
You should also get help if you cannot identify the detector or if opening the sensor could affect a monitored security system. A professional can identify the sensor, check the alarm panel, and test communication without guessing.
- ✦ Damaged wiring
Do not disconnect unknown alarm wiring simply to access a battery.
- ✦ Corrosion or leakage
Battery leakage can damage contacts and electronics.
- ✦ Repeated false alarms
Repeated alarms after a battery change may indicate a deeper sensor or system issue.
- ✦ Unknown monitored system
Contact the alarm provider before servicing a system that you do not fully understand.
Tips to get longer and more reliable battery life
A motion detector battery can last for a long time, but battery life depends on the detector, battery type, radio use, temperature, and other factors. There is no single replacement interval that applies to every model.
Instead of changing batteries on a fixed schedule without checking the system, pay attention to low-battery warnings and the manufacturer’s service guidance. A regular home security check can also help you catch weak batteries before they cause a sensor to stop working.
Keep the detector clean and make sure nothing blocks its normal detection area. Good maintenance does not replace a fresh battery, but it can help the sensor perform as designed.

- ✦ Use the specified battery
The correct battery chemistry and voltage help the detector operate as designed.
- ✦ Do not mix battery types
Use matching batteries when the detector requires more than one cell.
- ✦ Watch system warnings
Do not ignore a low-battery message for weeks or months.
- ✦ Keep the detector clear
Do not cover the sensor or place objects directly in its normal detection area.
- ✦ Record service dates
Writing down the replacement date can make future maintenance easier.
Do not wait for the detector to stop working
A low-battery warning is useful because it gives you time to replace the battery before the sensor loses reliable operation. Treat the warning as a maintenance task rather than something to silence and forget.
This is especially important for security sensors that protect doors, hallways, garages, or other key areas of a home. A working alarm system depends on each device being able to communicate with the panel.
- ✦ Act on warnings
Replace the battery when the system reports a low-battery condition according to the manufacturer’s guidance.
- ✦ Test after service
Always verify that the sensor works after installing the new battery.
Safety tips for replacing alarm sensor batteries
A motion detector battery replacement is a small repair, but it still deserves care. Batteries can leak, short, or become damaged if handled incorrectly. Keep batteries away from children and pets, and never use a battery that is swollen, cracked, or leaking.
Do not place loose batteries in a pocket with metal objects such as keys or coins. Keep the battery away from heat and flame. Follow local rules for battery disposal, especially for lithium batteries or damaged cells.
If you see corrosion inside the detector, avoid scraping the contacts without knowing what material you are dealing with. Corrosion can indicate a damaged sensor, and replacing the battery alone may not solve the problem.
- ✦ Use the correct polarity
Installing a battery backward can prevent normal operation and may cause problems in some devices.
- ✦ Never use damaged batteries
Do not install cells that are swollen, cracked, leaking, or otherwise damaged.
- ✦ Keep batteries away from children
Small batteries can be dangerous if swallowed and should be stored securely.
- ✦ Dispose of batteries properly
Use an appropriate local battery recycling or disposal option instead of putting certain battery types in regular trash.
Do not disable security features to make the repair easier
A tamper switch and alarm communication checks are part of the security system. Do not permanently disable them just because the detector is difficult to close or keeps showing a warning.
If the detector cannot return to its normal state after a correct battery replacement, find the cause. A working tamper circuit is important because it can alert you when the sensor housing is opened or disturbed.
- ✦ Keep the tamper function active
The tamper switch should remain part of the detector’s normal operation.
- ✦ Fix the cause of warnings
Do not hide a persistent fault simply to make the alarm panel look normal.
How to know when the battery change was successful
The final step in learning how to change the battery in a DSC or other-brand motion detector is confirming normal operation. The detector should sit securely, the cover should close fully, and the alarm system should stop reporting the old battery condition.
A successful test should also confirm that the sensor detects movement in the area it protects. If the panel or app shows the sensor as ready after testing, that is a good sign that the battery replacement and communication process worked.
Keep the old battery out of the detector and dispose of it through a suitable battery recycling or disposal route. Record the service date if you maintain several sensors in your home.
- ✦ No low-battery warning
The system no longer reports the detector as having a weak battery.
- ✦ No tamper warning
The detector cover and housing are correctly seated.
- ✦ Motion is detected
The alarm system responds when you move through the protected area.
- ✦ Sensor returns to normal
The alarm panel or app shows the detector in its expected ready or normal state.
A simple final check
Stand outside the detector’s immediate coverage area, then walk normally across the protected space. Watch the alarm panel or app for the expected motion signal. If the system responds correctly and returns to normal, the service is likely complete.
If the sensor does not respond, repeat the basic checks before buying another battery. The issue may be the cover, battery contacts, detector position, radio communication, or alarm panel rather than the battery itself.
- ✦ Walk across the detection area
Normal movement across the sensor’s field is a practical way to check operation.
- ✦ Check the alarm panel
Confirm that the panel receives the expected signal and returns to its normal state.