

Replacing a battery in a Honeywell motion detector is usually a simple home security task. Most wireless Honeywell sensors have a small battery compartment inside the housing. The exact opening method and battery type can vary by model, so the model number matters.
Before you start, make sure you know which Honeywell sensor you have. Popular Honeywell wireless motion detectors include models from the 5800 series, but other sensors may use different batteries or have a different case design. A careful check now can prevent false alarms, damaged clips, or a sensor that does not reconnect.
This guide explains how to change the battery in a Honeywell motion detector in a safe and practical way. It also covers low-battery warnings, testing, common problems, and what to do if the sensor still does not work after the battery change.

How to Know When a Honeywell Motion Detector Battery Is Low
A wireless motion detector can continue to detect movement when its battery is getting weak. The first sign may be a low-battery message from the alarm panel or security app. Some systems may also show a trouble signal or beep at regular intervals.
Do not wait until the sensor stops working completely. A weak battery can reduce reliability and may cause trouble alerts at inconvenient times, such as overnight or while you are away from home. Replacing the battery when the system reports a low-battery condition is a sensible maintenance step.
If you have more than one wireless sensor, check the alarm panel to identify the device with the low-battery warning. This helps you avoid opening the wrong motion detector.
- ✦ Low-battery warning
The alarm panel or security system may report a low battery or sensor trouble condition.
- ✦ Repeated beeping
Some alarm systems use periodic beeps to warn about a low battery or other system trouble.
- ✦ Intermittent operation
A weak battery may cause unreliable wireless communication or sensor operation.
- ✦ Battery age
If the battery has been installed for a long time, checking the sensor manual is wise even if no warning has appeared.
Do You Need to Replace the Battery Right Away
If the system reports a low battery, plan to replace it soon. The exact remaining battery life can vary with the sensor, battery type, temperature, usage, and alarm system settings. Treat the warning as a maintenance alert rather than a precise countdown.
Check Your Honeywell Motion Detector Model First
The most important step in learning how to change the battery in a Honeywell motion detector is identifying the exact model. Honeywell has made many wireless motion sensors, and they do not all use the same battery. The housing may also open in different ways.
Look for a model number on the front, back, inside cover, or label of the sensor. Common product families include Honeywell 5800-series devices, but the model number printed on your unit should be your main reference.
Do not choose a battery only because it looks similar to the old one. Check the sensor documentation or the battery information printed inside the device. Using the correct battery helps the detector operate as designed.
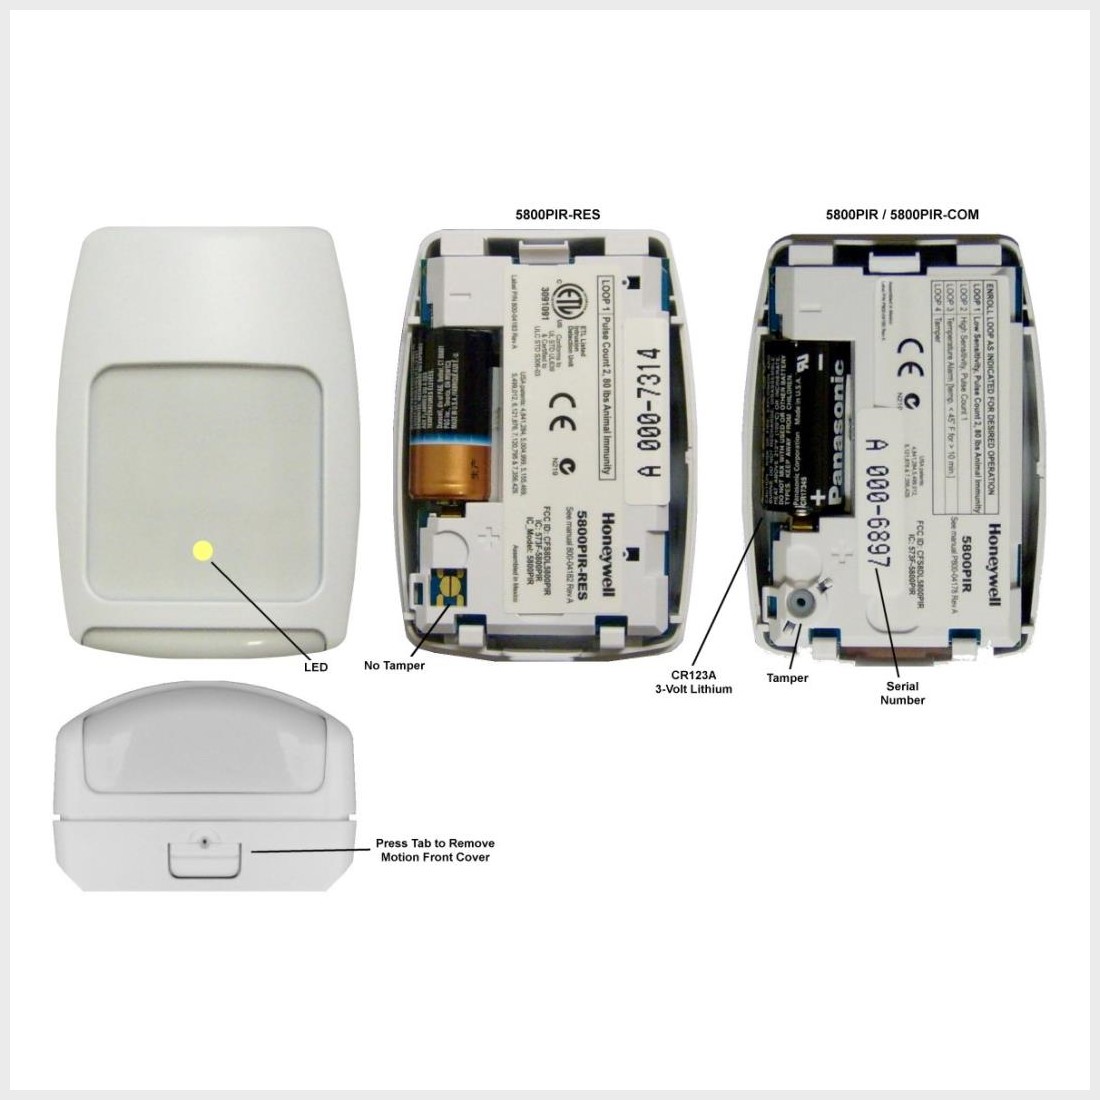
- ✦ Find the model number
Check the sensor label, case, installation paperwork, or security system documentation.
- ✦ Check the battery specification
Use the battery type specified for your exact detector model.
- ✦ Compare polarity
Look for the positive and negative markings before removing the old battery.
- ✦ Keep the old battery nearby
It can help you compare physical size and orientation, but the model specification should remain the final reference.
Why Honeywell Battery Types Can Differ
Motion detectors have different electronics, radio designs, and power needs. As a result, one Honeywell model may use a different battery from another model that looks almost identical. This is why a model-specific check is more reliable than a general battery list.
What You Need Before Replacing the Battery
You usually need only a few items for a Honeywell motion detector battery replacement. The main item is the correct replacement battery for your exact model. Some sensor housings can be opened by hand, while others may have a small latch or require a simple tool.
Have the new battery ready before you open the detector. If the sensor is part of an active alarm system, also have access to the alarm panel or security app so you can place the system in the proper mode before starting.
- ✦ Correct replacement battery
Use the battery specification provided for your exact Honeywell motion detector.
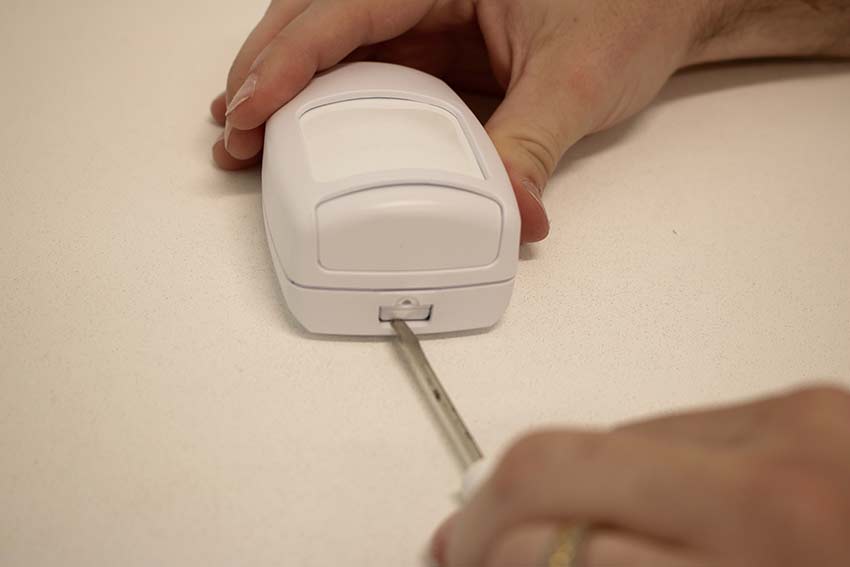
- ✦ Small tool if required
Some housings may have a release tab or fastening feature that requires a small screwdriver or similar tool.
- ✦ Alarm panel or app
You may need it to disarm the system, bypass the sensor, or enter a test mode.
- ✦ Clean work area
A clear area makes it easier to keep the battery and small parts under control.
Battery Safety
Keep batteries away from children and pets. Do not short the battery terminals, crush the battery, or use a damaged battery. Dispose of the old battery according to local battery recycling rules.
How to Change the Battery in a Honeywell Motion Detector
The basic process is simple, but do not force the housing. Honeywell used several case designs, so the release point can differ. If the cover does not move with gentle pressure, stop and check the model instructions.
Before opening the sensor, disarm the alarm system or follow the instructions for putting the system into test or maintenance mode. This can help prevent a tamper alert or unwanted alarm while you work.
Once the sensor is safe to service, open the housing using the intended latch or release point. Avoid pulling hard on the plastic because older housings and clips can become brittle over time.
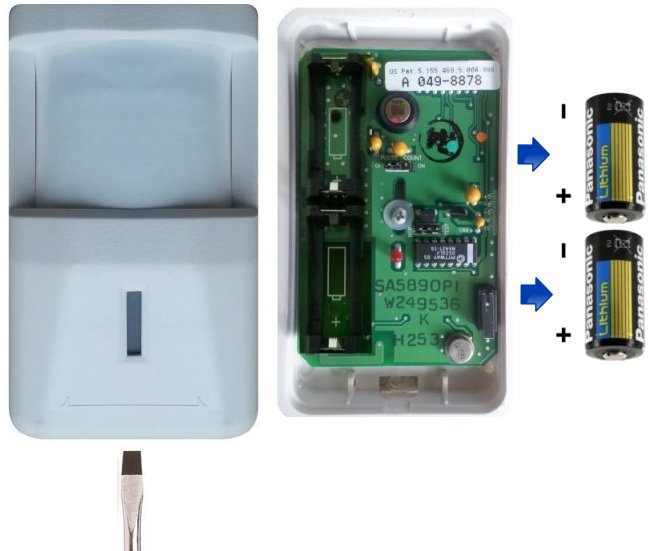
- ✦ Step 1: Put the alarm system in the proper mode
Disarm the system or use its approved test, maintenance, or bypass procedure before opening the sensor.
- ✦ Step 2: Open the detector
Use the sensor’s release tab, latch, or approved opening method. Do not force the cover.
- ✦ Step 3: Locate the battery
Find the battery inside the detector and note how the positive and negative ends are positioned.
- ✦ Step 4: Remove the old battery
Remove the battery carefully without damaging the contacts, wires, or plastic battery holder.
- ✦ Step 5: Install the new battery
Insert the correct replacement battery with the polarity matching the markings inside the detector.
- ✦ Step 6: Close the housing
Make sure the cover sits correctly and fully engages the housing.
- ✦ Step 7: Restore the alarm system
Exit test or maintenance mode if used, then follow the system instructions to restore normal operation.
- ✦ Step 8: Test the sensor
Walk through the detection area and confirm that the alarm panel or app receives the motion signal.
Pay Attention to Battery Polarity
Battery polarity matters. Look for plus and minus symbols inside the detector and match them to the battery. If the battery does not fit naturally, do not force it or reverse it.
Do Not Touch the Sensor Lens
The motion detector’s sensing area should stay clean. Avoid touching or wiping the lens with harsh cleaners while changing the battery. If the lens needs cleaning, follow the manufacturer’s care instructions.
How to Replace the Battery in a Honeywell 5800PIR Motion Detector
The Honeywell 5800PIR is a well-known wireless motion detector family, but the exact battery requirement and opening procedure should still be checked against the model documentation. Do not assume that every Honeywell 5800-series device uses the same battery.
For a 5800PIR-type sensor, first place the alarm system in the correct service or test condition. Then open the detector housing at its intended release point, identify the battery compartment, and note the battery orientation before removing the old battery.
Install the specified replacement battery, close the housing, and test the sensor. If the alarm panel still shows a low-battery or tamper message, allow the system to complete its normal update process and then troubleshoot the remaining warning.

- ✦ Confirm the exact model
Check the label before buying or installing a battery.
- ✦ Use the specified battery
Do not substitute a battery based only on physical size.
- ✦ Check the housing
Use the proper latch or release point to avoid breaking the case.
- ✦ Test after replacement
Confirm that the panel or receiver sees the sensor after the new battery is installed.
A Note About Honeywell and Resideo Branding
Honeywell-branded residential security products can also be found in documentation and systems associated with Resideo. Because product names and documentation can vary by generation, use the exact model number on your device when looking for instructions or replacement parts.
How to Close and Reset the Honeywell Motion Detector
After replacing the battery, close the detector carefully. The cover should sit flush with the housing, and any tamper switch or cover mechanism should return to its normal position. A loose cover can cause a tamper warning even when the new battery is good.
A battery change does not normally mean that you should erase or reprogram the sensor from the alarm panel. In many systems, the wireless sensor remains enrolled. The exact behavior depends on the alarm panel and detector model.
If the panel reports a trouble condition after the battery change, give the system a short period to update. If the warning remains, use the panel’s sensor status information to identify whether the issue is battery, tamper, communication, or another system fault.

- ✦ Check the cover
Make sure the housing is completely closed and properly seated.
- ✦ Check for tamper alerts
A tamper message can appear if the housing or tamper switch is not in its normal position.
- ✦ Do not delete the sensor
A normal battery replacement usually does not require removing the sensor from the alarm system.
- ✦ Allow the system to update
The panel may need a short period to recognize the new battery condition.
When a Reset May Be Needed
Some alarm systems have their own procedures for clearing trouble messages. Follow the instructions for your alarm panel rather than performing a random reset on the motion detector. A reset can mean different things on different security systems.
How to Test a Honeywell Motion Detector After Battery Replacement
Testing is an important part of how to change the battery in a Honeywell motion detector. Installing a fresh battery is not enough. You also want to confirm that the sensor can detect movement and communicate with the alarm system.
Start by following the test procedure for your alarm panel. Then walk through the motion detector’s normal coverage area. Watch for a motion event on the panel or in the connected security application.
Avoid standing directly in front of the detector for the entire test. Walk across the detection area instead. Passive infrared motion sensors generally respond to changes in infrared energy across their detection zones.

- ✦ Test the coverage area
Walk through the area where the sensor normally protects the room.
- ✦ Check the alarm panel
Confirm that the panel receives the expected motion event.
- ✦ Watch for trouble messages
A persistent low-battery, tamper, or communication warning needs further attention.
- ✦ Return the system to normal mode
Exit test or maintenance mode when the test is complete.
Why a Motion Test Matters
A detector can look normal and still have a communication or installation problem. A quick test gives you more confidence that the battery replacement did not leave the sensor offline or improperly closed.
What to Do if the Honeywell Motion Detector Still Shows Low Battery
A low-battery message that remains after replacement does not always mean the new battery is bad. The panel may need time to receive a new status from the sensor. The detector may also have a battery contact issue, an incorrect battery, or another fault.
Start with the simple checks. Confirm that the battery matches the model specification, that the polarity is correct, and that the battery is seated firmly. Then check that the detector cover is fully closed and the tamper mechanism is not being held open.
If the warning continues, check the alarm panel’s instructions for clearing or updating sensor trouble conditions. If you are unsure about the wiring, sensor programming, or alarm panel settings, a qualified security technician can inspect the system.

- ✦ Wrong battery
Verify the battery type against the exact detector model.
- ✦ Incorrect polarity
Check that the positive and negative ends match the markings inside the detector.
- ✦ Poor battery contact
Make sure the battery sits correctly against its contacts.
- ✦ Cover tamper
Confirm that the housing is fully closed and the tamper switch is properly engaged.
- ✦ System status delay
Give the alarm system time to receive the updated sensor status.
- ✦ Sensor fault
If the warning remains after all basic checks, the detector or alarm system may need professional diagnosis.
Should You Replace the Battery Again
Do not keep replacing batteries without finding the cause of the warning. If a known-good battery does not clear the problem, check the sensor model, contacts, tamper condition, and alarm panel status before installing another battery.
Common Mistakes When Changing a Honeywell Motion Detector Battery
Most battery replacement problems come from a few simple mistakes. The most common is choosing a battery without checking the exact detector model. Another common problem is forcing the case open instead of finding the correct release point.
It is also easy to forget the alarm panel. Opening an active security sensor can create a tamper event or trigger an alarm depending on the system configuration. Always follow your alarm system’s service procedure before opening a sensor.
Finally, do not stop after installing the battery. Close the sensor, restore the alarm system, and perform a basic motion test. That final check helps confirm that the job is complete.
- ✦ Guessing the battery type
Always verify the battery specification for the exact model.
- ✦ Forcing the housing
Use the intended latch or release method and stop if the case resists.
- ✦ Ignoring the alarm panel
Use the proper disarm, bypass, test, or maintenance procedure before opening the detector.
- ✦ Reversing the battery
Match the battery polarity with the markings inside the sensor.
- ✦ Skipping the final test
Always confirm that the detector communicates and detects movement after replacement.
When You Should Call a Security Professional
Many homeowners can handle a simple battery replacement. However, some situations call for professional help. If the detector is difficult to open, the housing is damaged, the alarm continues to trigger, or the sensor will not communicate after a new battery, further troubleshooting may be needed.
Professional help is also useful when the alarm system has complex programming or when you are not sure how to place it into test mode. Avoid changing system programming at random because it can affect other sensors or security functions.
If the sensor is part of a monitored alarm service, check the provider’s instructions before servicing it. Some monitoring companies have specific procedures for testing or placing the system on test.
- ✦ Damaged housing
A cracked or broken case may prevent the tamper switch from working correctly.
- ✦ Persistent alarm
Repeated alarms after a battery replacement may require a full sensor and system check.
- ✦ Communication failure
If the panel cannot see the sensor after the battery change, professional troubleshooting may be appropriate.
- ✦ Unknown system setup
A technician can help when you do not know the panel model or service procedure.
Do Not Ignore a Security System Trouble Signal
A trouble signal does not always mean the motion detector battery is the only problem. It can point to tamper, communication, power, or another system condition. Treat persistent warnings as something to investigate rather than simply silencing them.
Tips for Longer Honeywell Motion Detector Battery Life
Battery life depends on the detector, battery chemistry, temperature, radio activity, and how often the sensor communicates with the alarm system. There is no single replacement schedule that fits every Honeywell motion detector.
Use the battery type specified for your model and avoid storing replacement batteries in extreme heat or moisture. Keep the detector clean and make sure its mounting position has not changed.
If you notice repeated low-battery warnings much sooner than expected, do not assume that buying another battery will solve the problem. Check the sensor and alarm panel for other causes.
- ✦ Use the correct battery
The correct specification is more important than choosing a battery based on appearance.
- ✦ Store batteries properly
Keep spare batteries in a suitable dry place and follow the storage guidance on their packaging.
- ✦ Keep the detector clean
Follow the sensor care instructions and keep the sensing area free from dust and obstructions.
- ✦ Check unusual battery drain
Repeatedly short battery life may indicate a sensor, environmental, or system issue.
Extreme Temperatures Can Matter
Battery performance can change with temperature. If a motion detector is installed in an unusually cold or hot area, battery behavior may differ from a sensor installed in a normal indoor room. Follow the detector’s specified operating conditions when possible.
Frequently Asked Questions about How to change the battery in a Honeywell motion detector
The following questions cover the most common issues homeowners face when replacing a Honeywell motion detector battery.